Bone Marrow Biopsy
In many hematological conditions, particularly leukemias, examination of the bone marrow may be the only procedure to arrive at a correct diagnosis. It provides the opportunity of directly examining the tissue which forms blood cells. The examination is easy to perform and safe, except in severe bleeding disorders like hemophilia, and can be performed as an outdoor procedure as many times as required. There are two methods of examining the bone marrow:
- Smears prepared from a needle aspirate
- Sections prepared from a trephine or open surgical biopsy specimen of the bone marrow
Smears show better morphological details of individual cells and are also used for cytochemical staining and immunological studies. However these do not show spatial distribution of normal and abnormal cells and their exact quantity. For this a biopsy section is examined.
THE ASPIRATION OF BONE MARROW INDICATIONS
A needle aspiration of the bone marrow is indicated for the diagnosis of primary hematological diseases as well as for the diagnosis of certain other illnesses. It is also performed for determining effects of treatment given for some diseases.
a. Diagnostic
Megaloblastic Anaemia Aplastic Anaemia Sideroblastic Anaemias Iron-Deficiency Anaemia An anaemia of chronic disorder Acute Leukaemias Multiple Myeloma Metastasis in the bone marrow Storage in Disorders Visceral Leishmaniasis (Kala Azar) To obtain haemopoietic cells for cytogenetic studies, molecular genetic studies and immuno-phenotyping Culture for Mycobacteria and other bacteria in cases of PUO.
b. Prognostic
The staging of chronic leukaemias The staging of lymphomas To determine the response of treatment given for acute leukaemia and other disorders.
SITES FOR ASPIRATION
Selecting a site for bone-marrow aspiration depends upon the age of the patient, her/his physique and the expected distribution of the disease process. The various sites for bone marrow aspiration include:
1. Posterior Superior Iliac Spine/Crest (PSIS/C):
This is the most suitable site in adults and in children over two years of age. It has the ease of puncturing multiple sites at one time as well as sampling large volumes of bone marrow. It is safe and, as the patient cannot see it, it causes less apprehension to her/him. A bone marrow trephine biopsy can also be performed from this site, through the same skin puncture.

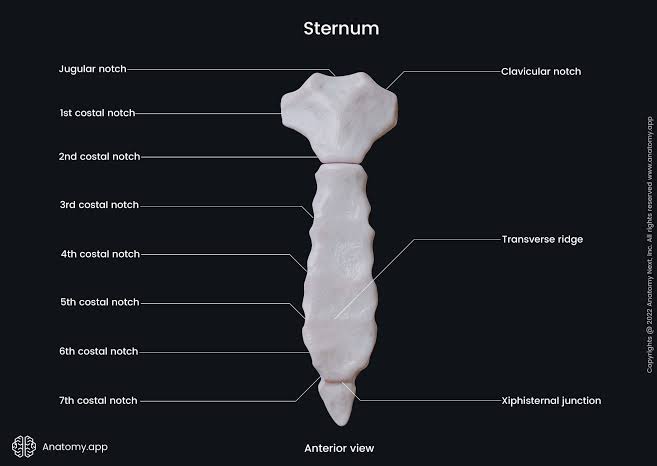
2. The Sternum:
The sternum is used in obese, adult patients. It is punctured opposite the second or third intercostal space, slightly to one side of the midline. The total thickness of the sternum is about 1.5 cm. Therefore, it is necessary that a guard be applied to the needle, so that it should not penetrate more than 0.5 cm of the bone.
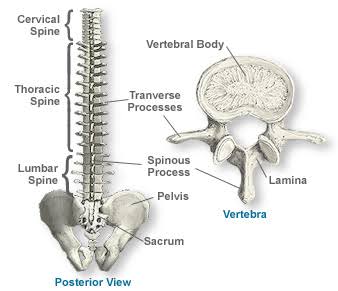
3. Spinous Process of the Vertebrae:
The spinous processes can also be selected for bone-marrow aspiration. However, it is necessary that these should be palpable. This is not the site of choice.
4. The Tibia:
In cases of children less than 2 years of age, the anteromedial surface of the tibia, slightly below the tibial tuberosity, is the site of choice.

5. Anterior Superior Iliac Spine:
This site may be used in obese patients, but it is not convenient. First, it is more painful as here the skin here is richly supplied with sensory nerves. Secondly, the overlying cartilage is thick. Thirdly, it is more acute and contains less marrow, particularly in the elderly.

6. Others:
Occasionally, an aspiration may be performed directly from a lesion that is visible in an X- ray, e.g. lytic lesions in the ribs and bones of the skull.
Requirements:
- Salah, Klima or Islam Needles are used for aspirating the bone marrow. First, two needles are provided with a guard and are suitable for aspiration from all sites. The Islam Needle is not provided with a guard, but it is longer than the other needles and has holes on the sides that permit the collection of a better, representative sample. It can only be used on the PSIS/C site.


- Recently, due to an increased danger of infections, disposable needles are being used. For this, Sternal Puncture Needles are now used for aspiration.
- Clean, grease-free glass slides, preferably with a frosted end, for easy labelling
- A Spreader
- A large piece of filter paper
- Disposable Syringes of 10 ml
- Disposable Syringes of 20-50 ml with a nozzle to fit in the aspiration needle.
- Antiseptic Lotion (0.5% Chlorhexidine in Ethanol)
- Local Anaesthetic (2% Lignocaine)
- A surgical blade mounted on a handle
- Surgical Towels
- Disposable, Surgical Gloves
- Towel Clips
- Sponge Forceps
- A Medicine Bowl
- Sterile, Surgical Gauze

PROCDEDURE:
- Prepare the tray or trolley with all of the requirements (listed above).
- Place a piece of filter paper and arrange 2-3 glass slides on it in slanting position against a support.
- Label at least 10 slides with the patient‘s identification and arrange for smear preparation.
- Draw about 5 ml of 2% Lignocaine in a disposable syringe and keep aside for later use.
- Wash your hands thoroughly with soap and water and put on the surgical gloves.
- Explain the procedure to the patient and reassure her/him. She/he should be particularly explained about suction pain.
- Position the patient, depending upon the site selected for the aspiration procedure.
- Clean the site with an antiseptic solution. Clean an area that is larger than required, to prevent infection.
- Drape the area with surgical towels.
- Inject Lignocaine into the skin, subcutaneous tissues and the periosteum of the bone in an area of about 1-2 cm. Wait for 3-5 minutes.
- Make a small, skin-deep nick with a blade at the selected site.
- Introduce the aspiration needle with a gentle boring movement. When the bone marrow is entered, there is a feeling of ‗giving away‘ of resistance. Move the needle a little more forward, until it is fixed.
- Remove the stillet and attach a 20-30 ml disposable syringe to the needle.
- Suck about 0.5 ml of marrow. (one of the indications that the marrow has been penetrated satisfactorily is the suction pain).
- Detach the syringe and replace the stillet.
- Immediately start making the smears so that the marrow does not clot by pouring the aspirated marrow on the slanted slides so that the free blood drains while fragments remain stuck on the slide, accomplishes this. Pick up the fragments with the edge of the spreader and gently smear on the prearranged slides.
- Put the remaining marrow in an EDTA bottle and mix it, so that more slides can be prepared (if required).
- Secure the hemostasis by firmly pressing the puncture site for 5-10 minutes.
- Apply the dressing.
A BONE-MARROW TREPHINE BIOPSY
INDICATIONS:
- Repeated dry/bloody tap
- Aplastic Anemia
- Myelosclerosis/Marrow Fibrosis
- Multiple Myeloma
- Hairy-Cell Leukaemia
- Acute Megakaryoblastic Leukaemia (M7)
- The staging of lymphomas
- The staging of other tumours (metastasis)
- In the case of PUO, for granulomas
SITES FOR THE TREPHINE BIOPSY
Only two sites can be safely used. These are the posterior superior iliac spine and the anterior superior iliac spine. The first one is the preferred site.
Requirements:
These are the same as for a bone-marrow aspiration, except that a Trephine Biopsy Needle is required in place of an aspiration needle and a bottle containing fixative is required. Most commonly, the needles that are used for bone marrow trephine biopsies are the Jamshidi and Islam needles. These come in three sizes: a standard adult size, pediatric size and a large size for obese patients. The most commonly used fixative is 10% buffered formal saline as used for other surgical biopsies. A preferred fixative is Acetic Acid–Zinc–Formalin (AZI), which is prepared by dissolving 12.5 g Zinc Chloride, 150 ml concentrated Formalin, 7.5 ml Glacial Acetic Acid and water up to 1000 ml. The specimen should be left in the fixative for 20-24 hours.
Procedure:
1. Prepare the trolley and the patient as for bone marrow aspiration. A Trephine Biopsy may be obtained at the same sitting as the aspiration. The only precaution required is that the insertion site of the trephine biopsy needle (in the bone) should be slightly away from the site where the aspiration needle was inserted. The needle, however, can be introduced through the same skin incision.
2. After penetrating the periosteum & the cortical bone, when the needle is fixed, the stillet is removed and firm, smooth, regular rotating movements are performed with enough pressure to further penetrate to a depth of about 1.5 to 2 cm.
3. To detach the internal portion of the marrow, clockwise and anti-clockwise movements are performed several times without further penetration. After this, the needle is withdrawn with the same rotatory movement.
4. The biopsy is dislodged onto a glass slide through the end that is opposite to the penetrating end, with the help of a stillet, to avoid a crushing effect.
5. The cylindrical biopsy is gently rubbed against the glass slide, with the help of another glass slide, to make impression smears.
6. It is then put in a specimen bottle that contains the fixative.
PROCESSING AND STAINING A BONE- MARROW BIOPSY
Fixed bone-marrow biopsies are de-calcified, dehydrated and impregnated with wax-like other histopathology specimens. Then sections are cut and stained as for other tissues. Two stains are routinely used: these are Hematoxylin-Eosin (H&E) Stain and a suitable reticulin stain. Other stains may also be used, if required. For demonstrating parasites, an ideal stain is the May-Grunwald-Giemsa Stain. However, it is difficult to obtain good results with this stain on bone-marrow sections. One method which gives the most satisfactory results is described below:
Requirements:
- Lugol's Iodine: Dissolve 5 g Iodine Crystals and 10 g Potassium Iodide in 100 ml distilled water.
- May-Grunwald Stain
- Giemsa Stain
- Buffered Water
- Glycerine-Ether: equal volumes of Glycerine and Diethyl Ether are mixed.
- Ethanol
- Xylol
- Coplin Jars
- Medium for Mounting
- A Cover Slip
Procedure:
- Place the sections in Lugol's Iodine for two minutes.
- Wash thoroughly in tap water.
- Rinse in buffered water.
- Dilute the May-Grunwald Stain with an equal volume of buffered water and place the sections in it for one hour.
- Dilute the Giemsa Stain with 19 volumes of water (1 in 20) and place the sections in it for two hours.
- Rinse with buffered water.
- Differentiate for a few seconds with Glycerine-Ether freshly diluted with four volumes of Ethanol.
- Dehydrate by making a rapid dip in Ethanol.
- Clear in Xylol.
- Mount, using the mounting medium and a cover slip.
Results:
The cytoplasm of immature cells is blue, that of erythroid cells is orange and that of maturing and mature granulocytes is pale pink. The granules of eosinophils stain bright red.
THE EXAMINATION OF BIOPSY SECTIONS OF BONE MARROW
First, scan the whole section with a scanner objective for the relative distribution of cellular and fatty marrow. In normal adults, this ratio is 1:2 to 1:1. Then, examine for gross abnormalities like necrosis, granulomas, metastasis and lymphoid aggregates. Note any abnormal infiltrate and its location. Switch to a x10 objective and note the number and distribution of the megakaryocytes. Also note the relative distribution of various haemopoitic elements. Switch to a x40 objective and note the morphology of both normal and abnormal constituent cells. Examine for any parasites or other inclusions in the cells. Then examine the section stained with the reticulin stain and note 307 the amount of fibrosis. In a normal marrow, only a few scattered fine fibres are seen, whereas in myelofibrosis, interlacing bundles of thick fibres are seen. The fibrosis in between can be graded from I to III, with the last being grade IV. If required, the sections that were stained with the May-Grunwald-Giemsa Stain should be examined. These are ideal for differentiating between megaloblasts and other blasts as well as for identifying intracellular and extracellular parasites.
REPORTING BONE-MARROW TREPHINE BIOPSY SECTIONS
The detailed description of reporting bone marrow trephine biopsy sections is beyond the scope of this manual. However, a general outline is as follows:
First, the gross appearance and size of the biopsy specimen is reported. Microscopic findings are reported in the same sequence as they were examined. All details should be clearly mentioned. Any abnormalities noted should be highlighted. Then the amount of fibrosis should be reported, followed by the conclusions drawn from the findings. Finally, give the most likely diagnosis. This may be followed by suggestions regarding further investigations.


Bone Marrow Transplant - Bone marrow transplant is a medical procedure used to replace damaged or destroyed bone marrow with healthy stem cells. It treats conditions like leukemia, lymphoma, and certain immune disorders. The transplant can be autologous (from the patient) or allogeneic (from a donor), offering hope for recovery and long-term remission. Visit: Best Bone Marrow Transplant Hospitals in India
ReplyDeleteTop Bone Marrow Transplant in India
Healthcare Tourism Company in India